I've been papercrafting since 2002, and am a Freelance Creative Designer. I work for various craft companies, but the majority of my work is for Sizzix, and I will be sharing details of my TV shows on Hobbymaker TV as well as (hopefully), helpful tutorials and step by steps. Thanks for joining me!
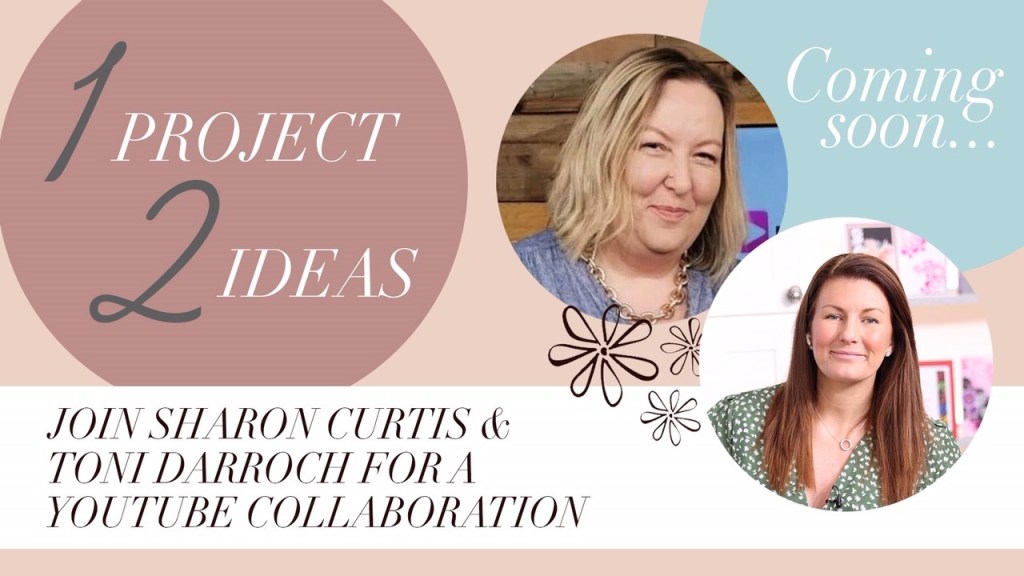
Today is the day! I’ve had such fun doing this video.
The lovely Toni Darroch asked me if I fancied doing a YouTube collaboration, and I agreed straight away. I find it hard to get the spare time to do videos, but I really enjoy doing them, so forcing myself into a deadline was a good way to motivate myself to find the time!
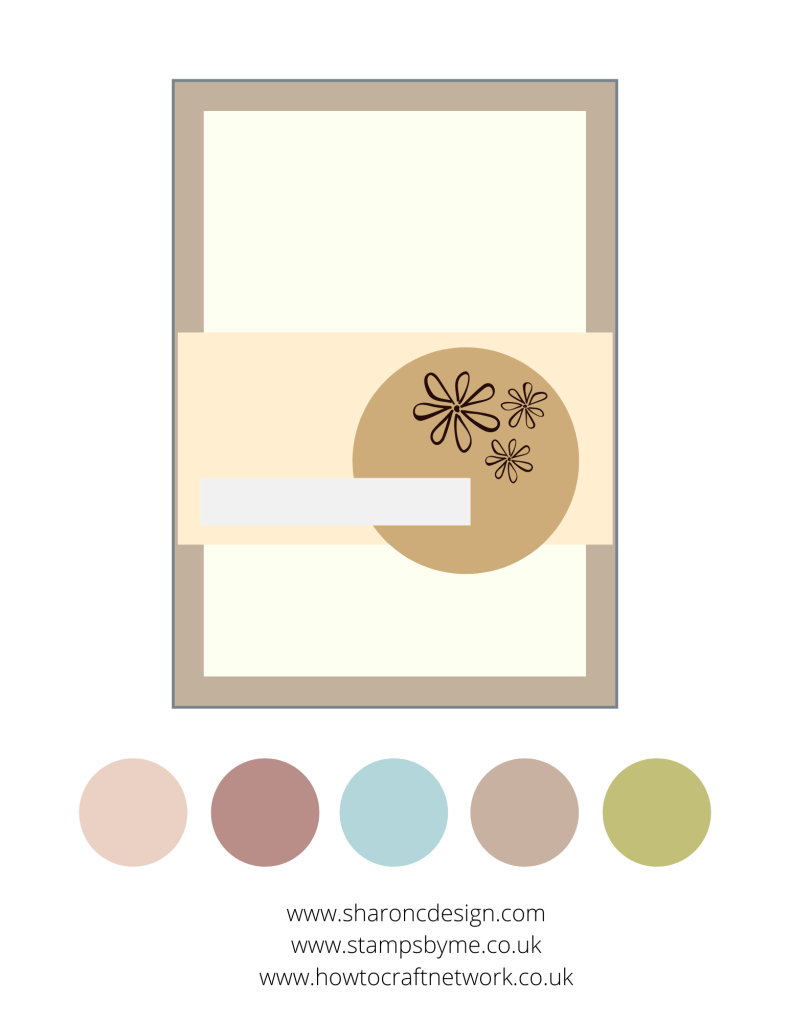
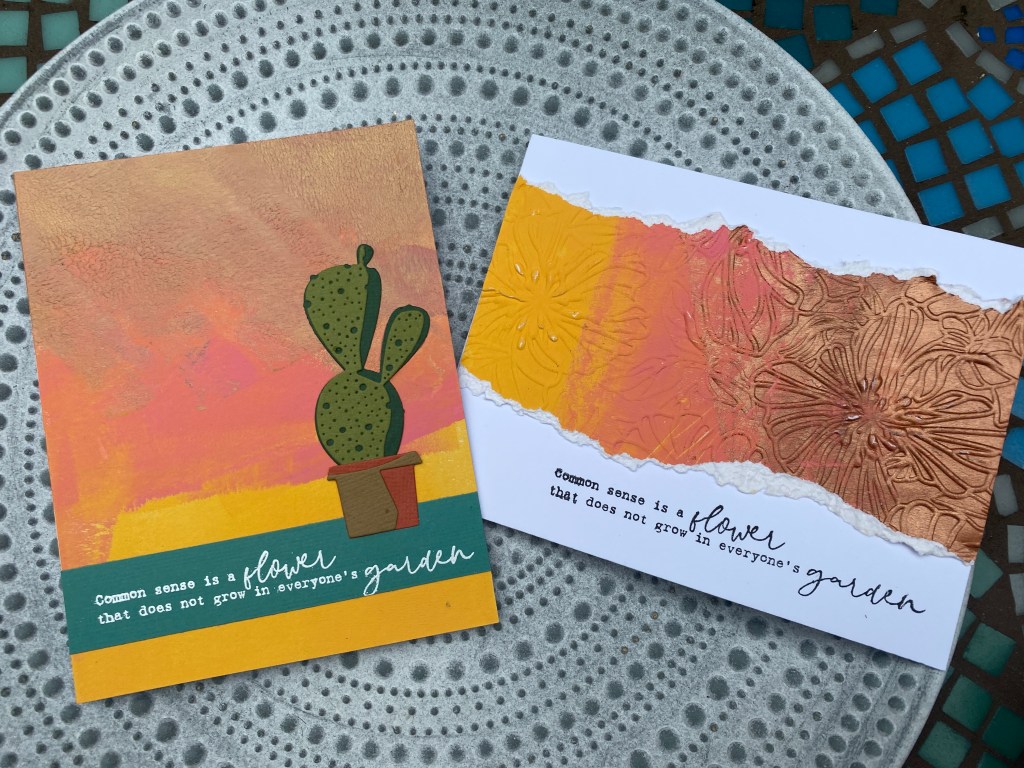
We decided to use a sketch and colour palette as a starting point, then create something from that, using whatever we wanted. Here’s the sketch and colour palette – feel free to print it/download it and use it for inspiration.
It’s always fun to see what someone else creates with the same products, or the same inspiration, so I couldn’t wait to see what Toni did, and her card is beautiful!
So here is the link to Toni’s video:
And here’s the link to mine:
Hope you enjoy watching these. If you have any suggestions for future videos, please let me know – I feel sure Toni and I will do another collaboration in the future, so watch this space……
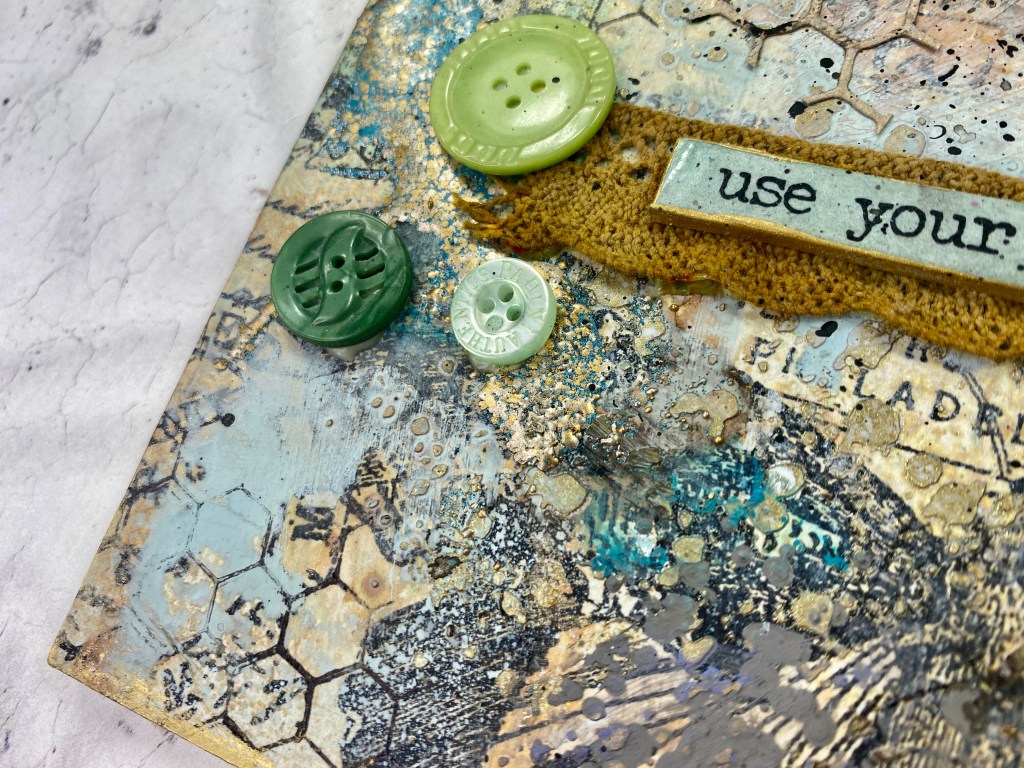
At first glance, this photo is a little deceiving because you imagine this to be a fairly small piece, like an average tag. However, I’ve used one of the Stampers Anonymous Etcetera Thickboard tags. This is the medium size and it’s about 12 x 6.5 inches.
I’ll apologise now for the length of this post – I’m going to take you through the steps to create this, and being a piece with lots of texture and layers, there’s a lot to tell you!
I started with the blank MDF tag, and gave it a coat of white gesso (I used the Sizzix gesso as this is nice and thick and I only needed one coat, but any gesso will do). After that, I added some of the Ideaology collage paper. I put a piece along the bottom, and then another torn piece towards the top left of the tag. I used collage medium to stick it down, then added a little more on top to seal it. After that I started layering some colour. I used various Oxide sprays as well as the standard Distress sprays, colours used were – Speckled Egg, Antique Linen, Salvaged Patina, Hickory Smoke, and Gathered Twigs. I added several layers of colour, spritzing with water and drying in between to stop the colours mixing too much.
Once that was dry, I added a little bit of texture with a stencil and some texture paste (Prima Icing Paste in White Gold). I used a Stampers Anonymous stencil that looks like splatters. I also added some brown texture paste through a Prima script stencil.
Once the paste was dry I added a little more Distress spray. Once that was dry I added some stamping here and there, and die cut some honeycomb elements from the Sizzix Mixed Media die set from kraft card. I sponged some black paint on these before adding to the tag. Next I added some gold Sizzix Luster wax around the edges of the tag and on the reinforcer. Then I added some embossing ink (using WOW Mixed Media Embossing brush), and heat embossed with some of the Stampendous embossing enamel – I used Aged Teal and Aged Bronze. This gives a lovely melted metal look.
Now it’s time to add the elements. I die cut the Perspective Moth three times from black card and layered them up so the wings could be shaped. I added glossy accents to the body and sprinkled on some of the new Tim Holtz black glitter. I spritzed the wings with various colours of Izink sprays which have a lovely sparkle. I decided I wanted a darker colour though, so went over this in places with some of the Prima Sparks Acrylic paints. I then glued the moth to the tag.
I gathered together a few different elements to provide an area to put some text. I cut a piece of lace ribbon and coloured it with Gathered Twigs Oxide spray. I die cut the Sizzix Seal die from kraft card then painted with Sizzix Gold acrylic paint. I tucked this under the ribbon, then added some buttons and a metal flower. I took one of the Tim Holtz quote chips and covered it with Distress enamel in Speckled Egg and added some gold acrylic paint around the edges. For a final touch, I took a metal number (again from a Tim Holtz set), but the silver colour didn’t go with all the gold tones, so I added some alcohol inks in green and copper, then added some DecoArt Texture Sand paste mixed with the Stampendous Aged Teal Enamel and heated it to give a distressed, rusty patina kind of look.
Then, the final touch was just to add some splatters of black paint all over.
This is the first time I’ve used one of these large tags, and I have to say, I really like the size and thickness for mixed media projects. I’ve listed most of the products I’ve used below.
Affiliate links are used at no cost to you
Sizzix Big Shot Die Cutting machine Shop at: SSS | SZ | AZ | CS | SBC | CC
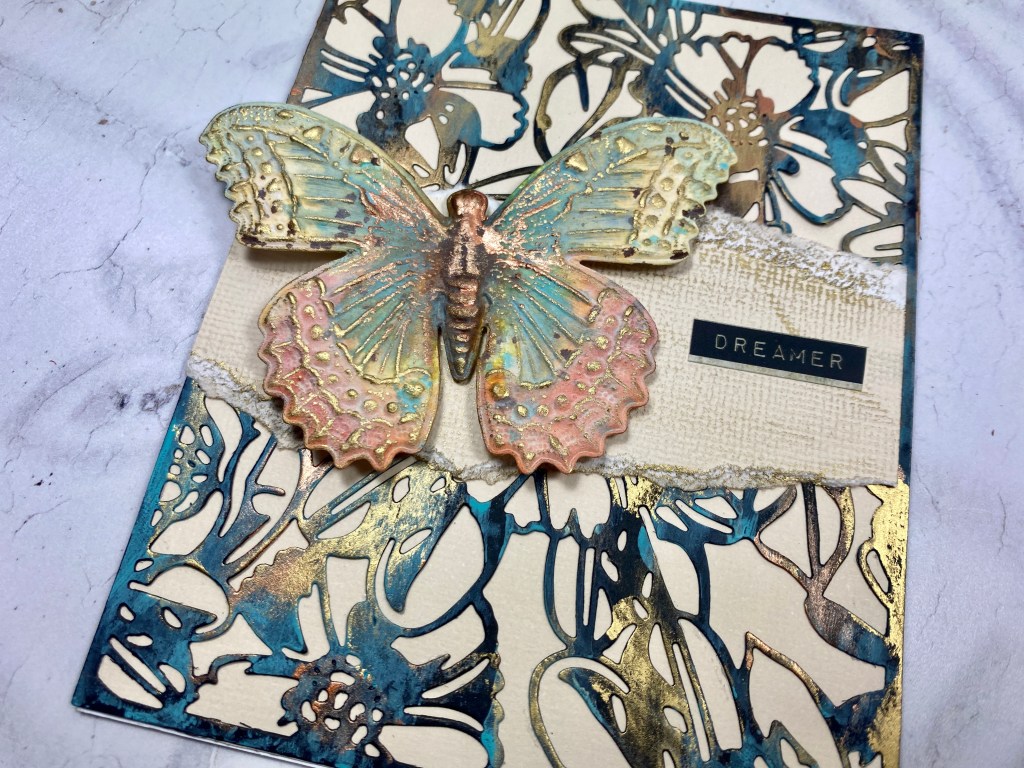
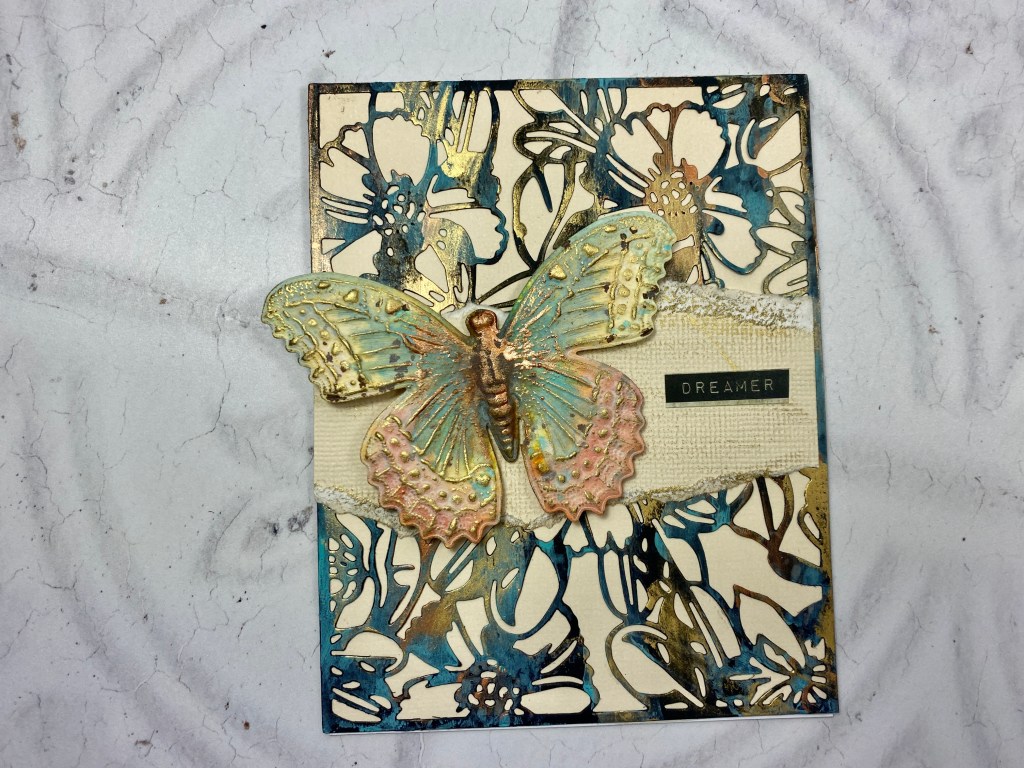
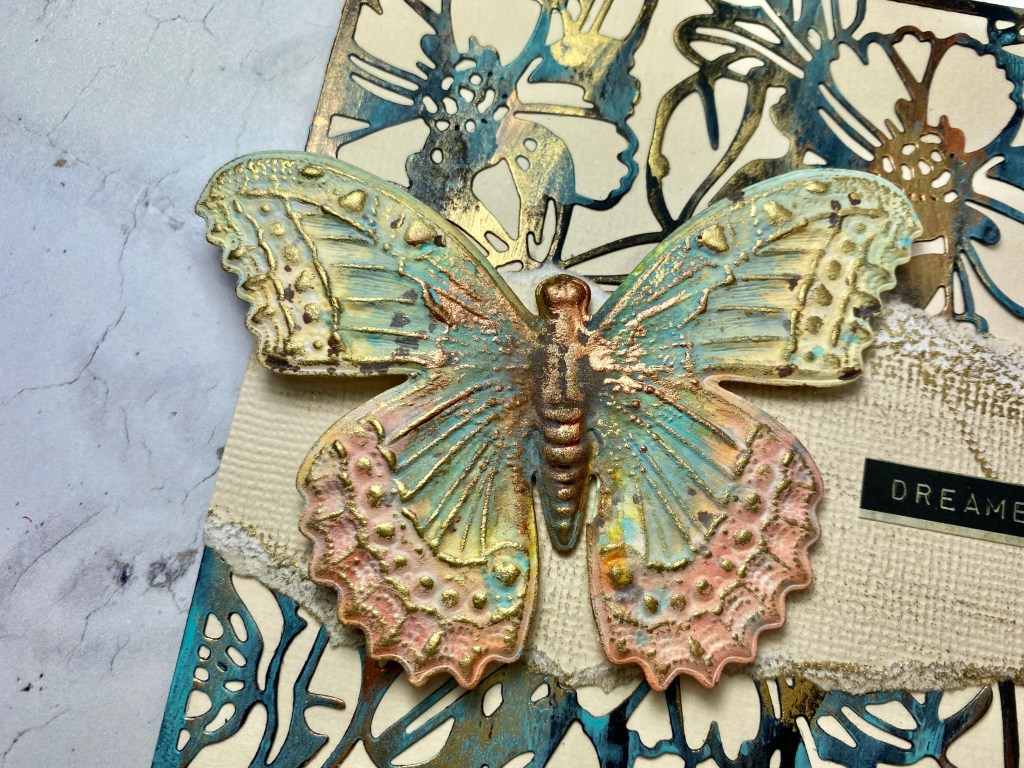
I was inspired after watching the Tim Holtz Chapter 3 live on Saturday, and I realised that I had the butterfly Impresslits die, so decided to make a butterfly card!
If you aren’t familiar with Impresslits, they are embossing folders, that have a thin metal die embedded in the folder, so that as well as embossing the image, they cut them out at the same time. Very clever. This one is a 3D folder too, so the detail you get is absolutely stunning.
I cut the butterfly from watercolour card, then gave it a first coat of colour with some Antique Linen Distress Oxide spray – I put some on my glass mat and used it with a wet brush. I dried this off, then added some Vintage Photo Oxide spray to the body part of the butterfly. I then added various colours to the wings, drying in between and occasionally spritzing with water to move the colour around until I was happy with it. I used Scattered Straw and Crackling Campfire towards the bottom, and Bundled Sage and Speckled Egg on top, then added little splatters of Salvaged Patina. Once dry, I then went in with some Sizzix Luster Wax in Gold, as well as little bit of Sizzix Acrylic Paint in Gold and Rose Gold. Last detail was a splatter of Vintage Photo with a small brush to add some little splatters of dark colour.
For the background, I covered a card blank with some cream card (from the Sizzix Botanicals card stock pack). Then I die cut the Sizzix Tim Holtz Flowery Die from black card. I used a brayer to add some colour with the Sizzix Acrylic paint in Rose Gold and Gold, and touches of Salvaged Patina Distress paint.
Because this background is quite busy, I didn’t want the butterfly to get lost, so I added a torn strip of the same cream card across the front, then added a little gold wax to tie it in with the background. I added the butterfly with foam pads – just sticking in the centre so the wings can be shaped upwards a little, then added a little sentiment sticker.
Affiliate links are used at no cost to you
Sizzix Big Shot Die Cutting machine Shop at: SSS | SZ | AZ | CS | SBC | CC
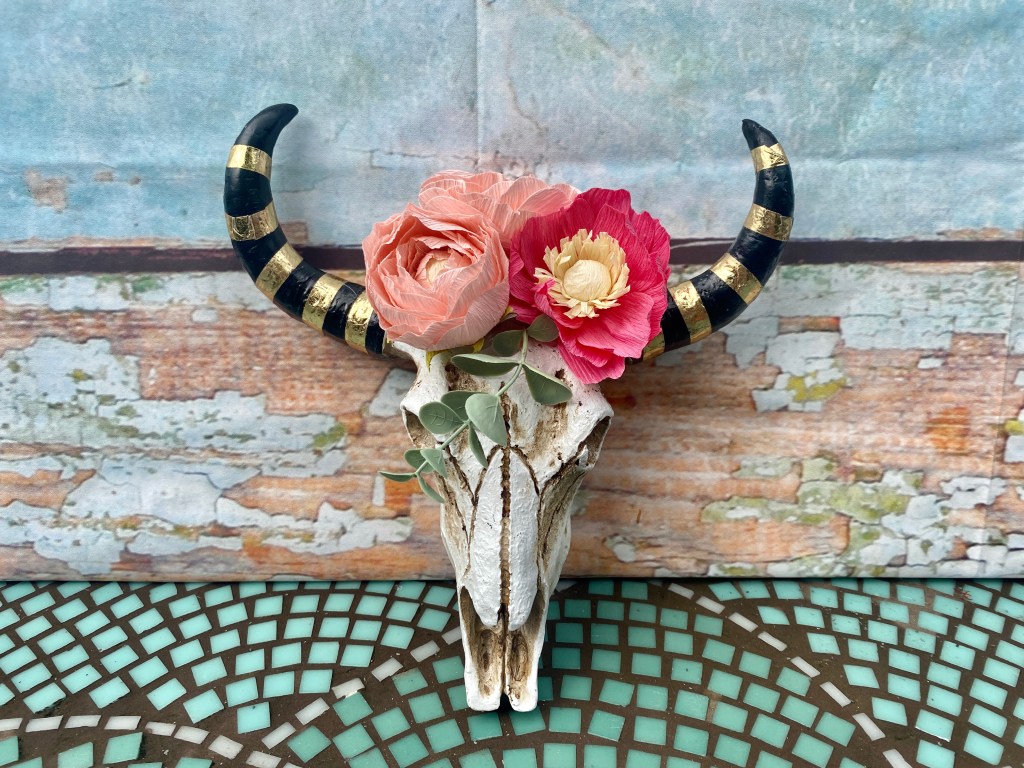
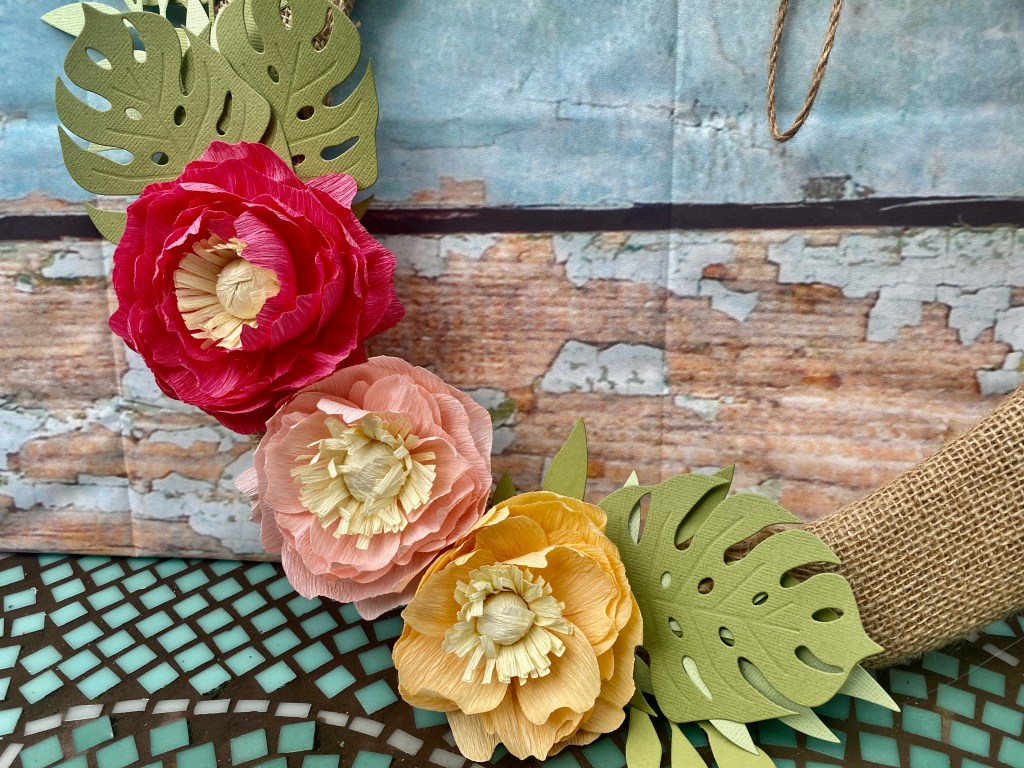
I can’t quite believe it, but my gorgeous niece Georgie is going to be 21 in July. Makes me feel very old. I decided to get my crepe paper flower dies out to make a bold statement flower to dress up a very plain kraft bag.
For the card, I used some dies from the recent Botanical collection by Lisa Jones at Sizzix, the Wild Wreath die is great for special cards.
I’ve put details below of all the other dies I used to create this gift bag and card.
Affiliate links are used at no cost to you
Sizzix Big Shot Die Cutting machine Shop at: SSS | SZ | AZ | CS | SBC | CC
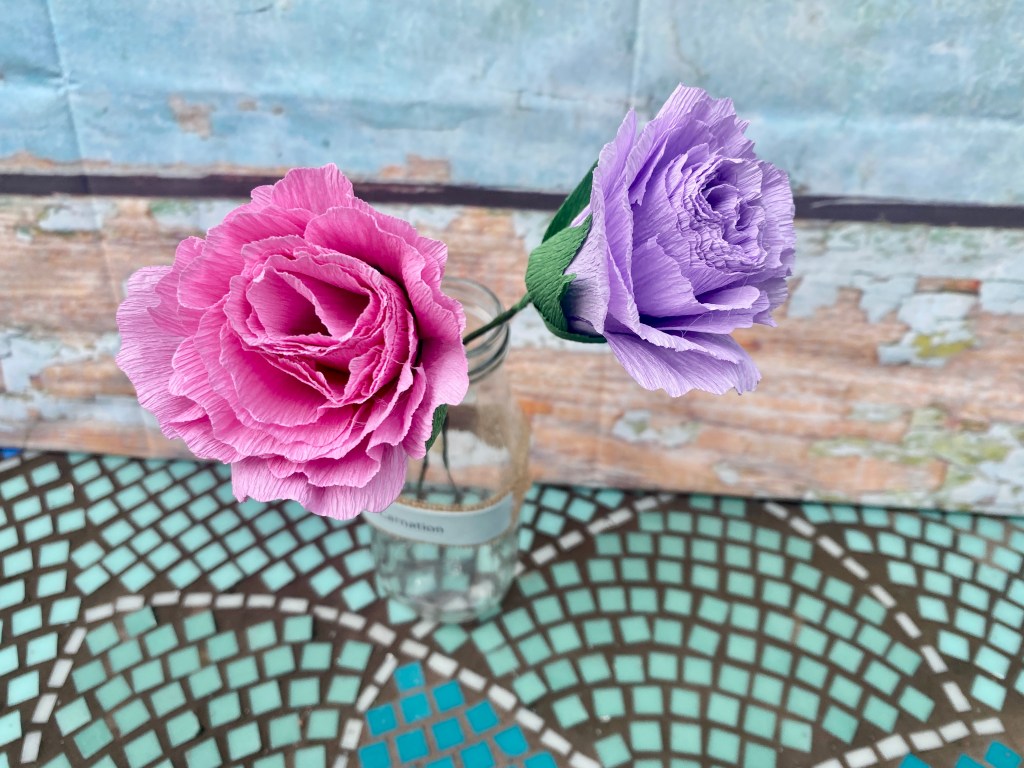
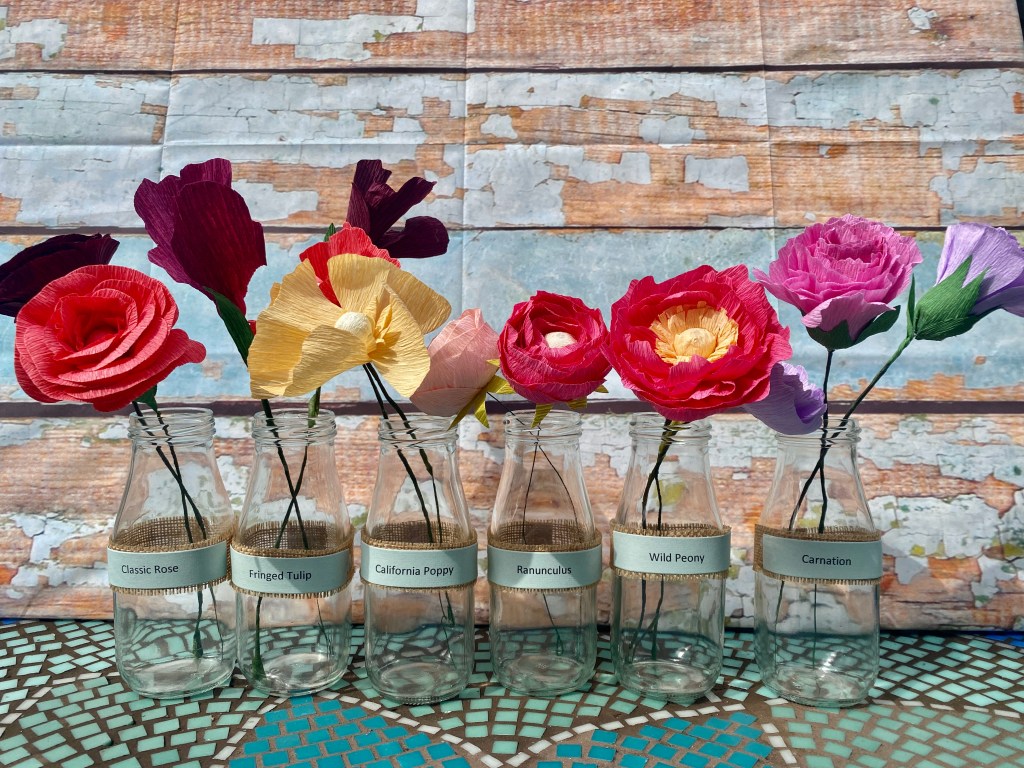
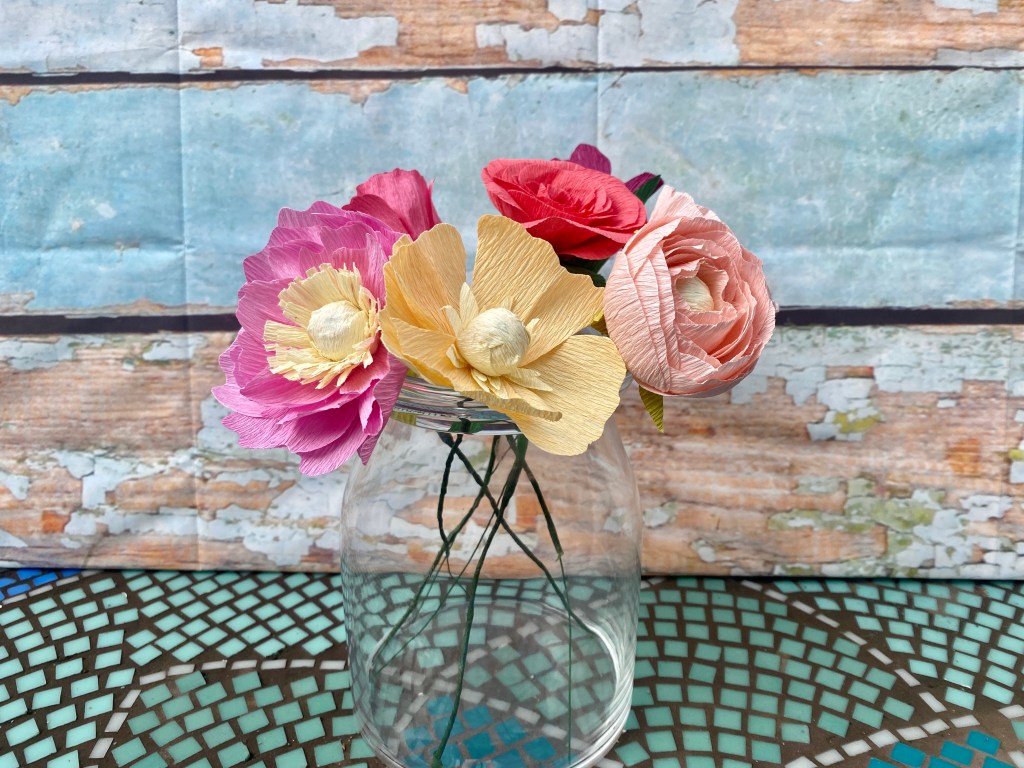
I’m back at Create and Craft for the next couple of days launching these fabulous flower dies and crepe paper collection. I’ve never really made crepe paper flowers before and was really surprised how easy they were, and how much you can shape the crepe paper to create really realistic petals. It’s obviously personal preference as to how many of each petal layer you cut, and how you shape them, but I thought it might be helpful for anyone buying these if I list out exactly how I put mine together, then you can use that as a starting point.
Fringed Tulip
For the Fringed Tulips, I used – 3 of the centre pieces, 1 of each petal, 2 leaves. This is one of the easiest to put together.
California Poppy
For the California Poppy I used; 1 each of all of the dies. Again this is a very simple one to put together.
Wild Peony
For the Wild Peony, I used; 4 of the fringe die, 4 of the double petal die, 6-8 of the small petal, and 6 of the large petal.
Carnation
For the Carnation I used; 4 of the strip die, 10 individual petals 1 green piece for the bottom, 1 or 2 leaves.
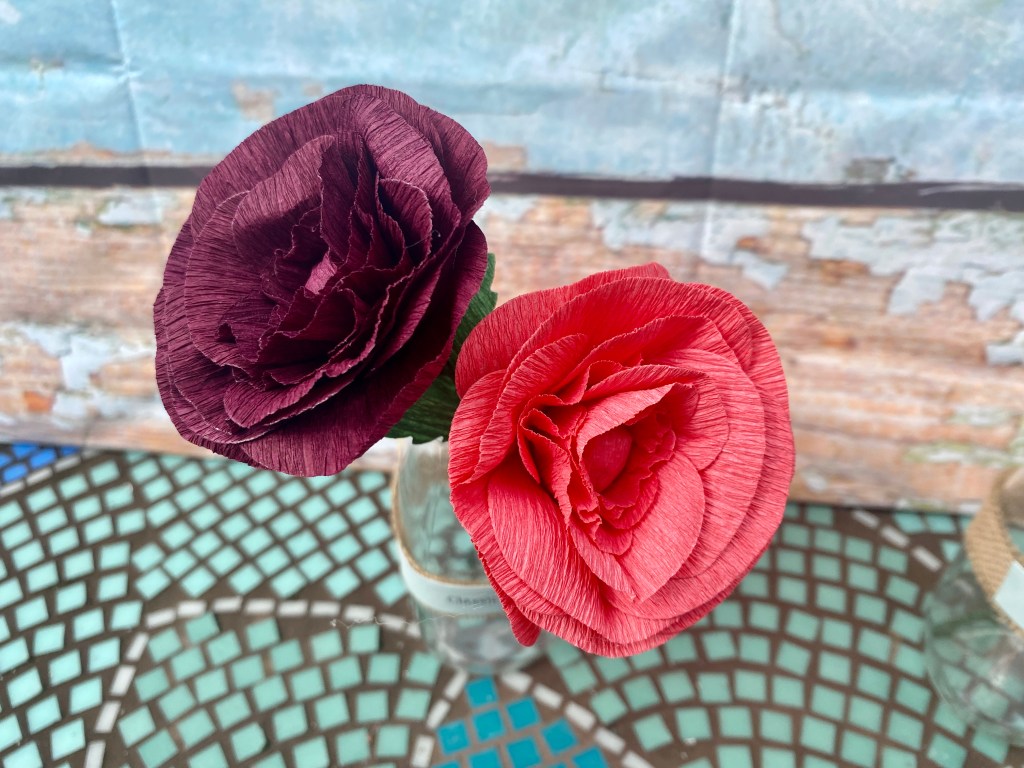
Classic Rose
For the Classic Rose I used; 4-6 of the smallest petal, 8 medium petals, 10 large petals, then the green piece for the bottom and the 2 leaves.
Ranunculus
For the Ranunculus I used; 6 of the small ovals, 10 of the medium and 15 of the large ovals, one green piece for the bottom and 1 or 2 leaves. I would say this flower is the most difficult and time consuming, as you do need to shape the petals in a nice cup shape the get a realistic flower, and this one also used the most petals, so takes a little longer. Saying that, I think this one is my favourite of them all.
I do plan to do a video later this week after the shows to demonstrate properly how to shape the petals, cover the beads etc., so hopefully that video will be ready by the time you get your dies if you order them from the show 🙂
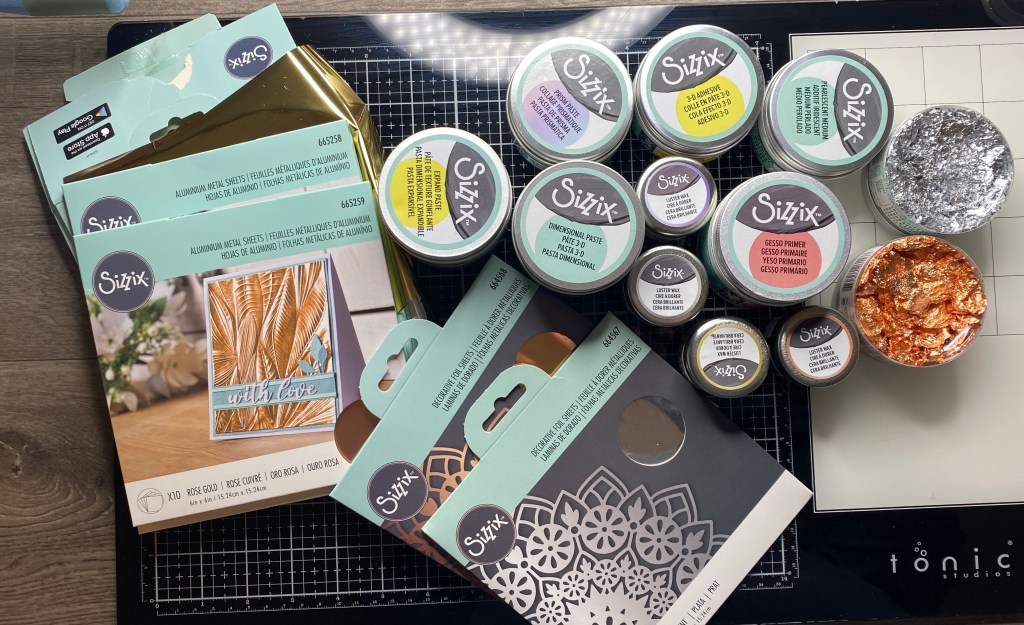
Have you seen the new range of Sizzix Effectz products yet? It’s a whole range of paints, mediums, pastes, waxes, foils and flakes – everything you need to get started with mixed media. Obviously as they are from Sizzix, they will work perfectly with your dies to take your projects to the next level.
I did some shows on Create and Craft TV last week to show what you can do with all these new products, and I had a few messages from ladies who said they were really pleased I went right back to basics when explaining what you can do with them because they found that really helpful.
So, if you are unfamiliar with how to use dimensional pastes, waxes, pearlescent medium, gold flakes, foil etc. then this video is for you. It’s a bit of a long video (and probably not great viewing for experienced mixed media artists), but if you’re a relative beginner, then hopefully this is really going to be of use to you if you’d like to try these products.
Affiliate links are used at no cost to you
Sizzix Big Shot Die Cutting machine Shop at: SSS | SZ | AZ | CS | SBC | CC
Sizzix Chrome Precision Base Plate Shop at: SSS | SZ | SBC | CC
This week is very exciting, both Pete and I have shows on Create and Craft TV launching the new Effectz range of creamy acrylic paints, foils, pastes and waxes. So many exciting possibilities with these new goodies.
I do plan to do a video run through of all the new products, I’ve linked them all at the end of this post. I probably won’t get time to film it until next week though as I’m at Create and Craft on Wed, Thursday and Sunday.
Affiliate links are used at no cost to you
Sizzix Big Shot Die Cutting machine Shop at: SSS | SZ | AZ | CS | SBC | CC
Sizzix Chrome Precision Base Plate Shop at: SSS | SZ | SBC | CC
I’ve got a very busy week of shows this week. Both on Create & Craft UK and US.
First up, I’m on Create & Craft US on Wednesday with a bit of a Sizzix takeover. There are 4 shows back to back, two will be mixed media shows with these gorgeous Lisa Jones botanical dies, then I’ve got 2 shows with the brand new Effectz range of paints and mediums. Check out the website for timings as I know they’ll be different depending on which time zone you are. For UK viewers that might want to watch them, you can watch if you go to http://www.createandcraft.com/us. I’m on from 9pm to midnight our time.
The UK shows are as follows – double Mixed Media show with these gorgeous Botanical dies (and the new Tim Holtz Colorize sets called Under the Sea) on Thursday at midday, then Pete takes over with the launch of the new Effectz range. He’s there Thurs/Fri/Sat, then I’m back on Sunday at 14.15 with my take on the Effectz range. I’ll share my projects with those in a separate blog post.
So it’s a very busy week on C&C for Sizzix!
Affiliate links are used at no cost to you
Sizzix Big Shot Die Cutting machine Shop at: SSS | SZ | AZ | CS | SBC | CC
Sizzix Chrome Precision Base Plate Shop at: SSS | SZ | SBC | CC